Poor, poor neglected blog!! My blog definitely got neglected with all of the craziness of the Christmas season. Between preparing for and attending craft sales every weekend from mid November to right before Christmas and trying to prepare for Christmas at home, there was just no time to keep the blog up-to-date. Hopefully things will get back on track here soon.
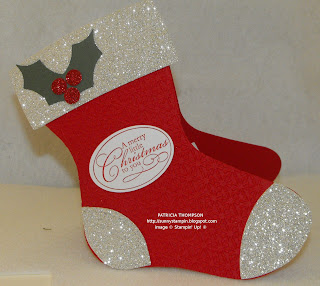
There were times when I didn't even take pictures of the projects I was working on but I will post what I did manage to photograph. This is a pic of a gift card holder that proved to be a good seller at the craft sales:
This gift card holder uses one piece of paper folded in half and placed on the stocking die so that the crease is just below the top cutting mark of the stocking. The cuff, heel and toe are cut from the silver glimmer paper and the holly berry is cut from the stocking accessories die from always artichoke card stock and red glimmer paper. There is a pocket inside that holds the gift card.
Here are some of December's club projects:
This ornament is cut from red glimmer paper using the scallop circle die and a treat cup. The snowman is stamped on vellum using black stazon ink and coloured using markers. A small amount of mica flakes are placed in the treat cup before attaching the stamped vellum to the back of the cup. You don't want to use too much of the mica flakes or the snowman looks buried in the snow! Punch a circle out of the red glimmer scallop circle using the 1 3/4 circle punch. By putting the scallop circle in as far as it will go into the punch you end up punching out towards the bottom of the circle but that's okay as it gives you room to place a Merry Christmas banner on the top. A second red glimmer scallop circle is also punched out with the circle punch. These two scallop circles will be attached to each other but remember to attach a loop of ribbon at the top first so you have something to hang your ornament by. Having the back punched out allows the Christmas tree lights to shine through the ornament. The Merry Christmas banner was stamped on whisper white using basic black ink and cut out free hand (something I don't do well!). I loved how this ornament turned out!!
This Christmas card uses non traditional colours and the bling is a definite wow! The colours used here are basic black and tempting turquoise. The ornament is punched out of the silver glimmer paper using the ornament punch and then coloured using an aqua pen and tempting turquoise reinker. Thank you to Patty Bennett for the instructions on colouring the silver glimmer paper. Check out Patty's blog here:
http://www.pattystamps.typepad.com/pattys_stamping_spot/
The whisper white layer is embossed using the perfect petals embossing folder. A piece of black 1/8 ribbon is placed on the whisper white layer before it is attached to the tempting turquoise layer. A piece of silver glimmer paper is punched out using the ribbon punch, placed on the coloured ornament and then the sides are trimmed. The ornament was popped up and a black ribbon bow was attached to the top of the ornament. The bling on this card is stunning! Love it!
Another club project was a post-it note holder. This item holds a mini gel pen and a post-it note pad inside. A simple project and a popular item at the craft sales.
I finally was able to play with some of my new product that will be coming out in the Occasions Mini starting January 4th:
This card also uses the coloured silver glimmer paper but this time I used baja breeze. Some of the products used are the baja breeze 3/8" pleated satin ribbon, the labels collection framelits die, the adorning accents edgelit die and the adorning accents textured impressions embossing folders. I am such a sucker for anything using the Big Shot so all of the wonderful new dies in this mini made me very happy!!
Today I need to prep for a kids class we are having tomorrow. A very smart Grandma booked a class so that the kids could have a little something to do during the Christmas break. I will post pics of our class projects after tomorrow.
I hope everyone had a wonderful Christmas. Thanks for stopping by.
Pat


No comments:
Post a Comment
Thanks for stopping by. Please leave a comment to let me know you were here.